

Table of Contents
Overview
In this quick tutorial, we are going to show how to make an automatic temperature based fan speed controller by interfacing LM35 temperature sensor with Arduino and monitor the real time temperature and fan speed data on 16X2 LCD display.
Working Principle:
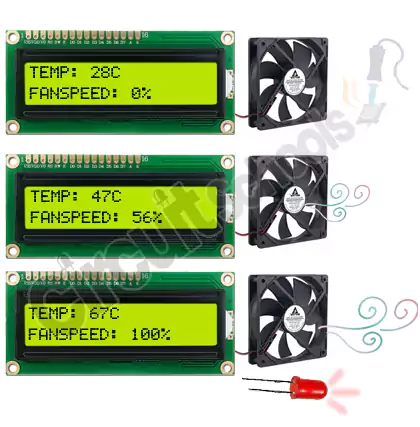
In this example project, first we get the Realtime temperature values from the LM35 temperature sensor and according to those value we are going to adjust the speed of the fan. i.e., when the temperature is high the fan is going to spin at high speed and when the temperature is low, the fan will be stopped. The fan speed will directly proportional to the temperature observed on LM35 temperature sensor. when the temperature observed is more than the max temp a small 5mm LED will glow to indicate as max temp.
User can easily monitor the temperature values in Celsius and fan speed in percentage on the LCD display module connected with Arduino.
You can change the minimum and maximum temperature values in the code according to your requirement so the fan speed adjusts according to them.
Required Components
| No’s | Component name |
| 1 | Arduino Uno |
| 1 | LM35 temperature sensor |
| 1 | 16X2 LCD display module with I2C adapter |
| 1 | 12V DC Fan |
| 1 | 2N2222 NPN Transistor |
| 1 | 1K ohm resistor |
| 1 | 1N4007 Diode |
| 1 | 10uF Electrolytic Capacitor |
| 1 | 5mm LED |
| 1 | 12V power supply |
| Few Connecting wires |
Circuit Diagram
Interface all the required components according to the circuit diagram shown below.

From the above Schematic diagram you can see the LM35 temperature sensor Signal pin is connected to Arduino to A0 of Arduino and Vin and GND are connected to 5V and GND respectively. LM35 gives analog output voltage which is proportional to temperature and operates for a range of temperatures between -55 to 150 degree Celsius.
A 16X2 I2c LCD display is connected to 5V and GND with Arduino 5V and GND and the I2c pins SDA and SCL of LCD module are connected to A4 and A5 respectively. If you want to connect the LCD display with out I2C refer the below article link.
12V DC fan is connected to pin 11 of Arduino,
Arduino is powered from the 12V external power supply may be from an adapter or a battery to VIN and GND of Arduino. Use the power supply according to the fan power consumption and Arduino consumption.
The 2N2222 NPN transistor acts as a controller switch which controls the speed of the fan by using the signal from the Arduino. The IN4007 Diode acts as a protection for the fan from being damaged.
When the temperature exceeds the max temp the 5mm LED light glows.
Working of the temperature based fan speed controller Circuit
LM35 temperature sensor senses the temperature and send the analog signal to Arduino, then Arduino converts the analog signal to digital signal and display the value on LCD display and calculate the percentage of speed the fan should be spinned.
The calculated percentage is sent to DC fan through the low frequency (PWM)pulse-width modulation signal which adjusts the fan speed by varying its Duty cycle. A cheap and compact 2N2222 or BD139 NPN transistor is used in this circuit as it is efficient because it is used as a switch.
Source code:
After connecting all the components according to the circuit diagram, next step is to upload the code to Arduino by connecting it to pc using an USB cable. Copy and paste the below code in Arduino IDE, Select the correct COM port and Arduino as board and upload the code.
//#include <LiquidCrystal.h>                unquote this for LCD display without I2c
//LiquidCrystal lcd(12, 11, 5, 4, 3, 2);

#include <LiquidCrystal_I2C.h>
LiquidCrystal_I2C lcd (0x3F, 16,2); // if error get address from i2c scanner
int tempPin = A0; // the output pin of LM35
int fan = 11; // the pin where fan is
int led = 8; // led pin
int temp;
int tempMin = 30; // the temperature to start the fan 0%
int tempMax = 60; // the maximum temperature when fan is at 100%
int fanSpeed;
int fanLCD;

void setup() {
pinMode(fan, OUTPUT);
pinMode(led, OUTPUT);
pinMode(tempPin, INPUT);
lcd.begin(16,2);
Serial.begin(9600);
}

void loop()
{
temp = readTemp(); // get the temperature
Serial.print( temp );
if(temp < tempMin) // if temp is lower than minimum temp
{
fanSpeed = 0; // fan is not spinning
analogWrite(fan, fanSpeed);
fanLCD=0;
digitalWrite(fan, LOW);
}
if((temp >= tempMin) && (temp <= tempMax)) // if temperature is higher than minimum temp
{
fanSpeed = temp;//map(temp, tempMin, tempMax, 0, 100); // the actual speed of fan//map(temp, tempMin, tempMax, 32, 255);
fanSpeed=1.5*fanSpeed;
fanLCD = map(temp, tempMin, tempMax, 0, 100); // speed of fan to display on LCD100
analogWrite(fan, fanSpeed); // spin the fan at the fanSpeed speed
}

if(temp > tempMax) // if temp is higher than tempMax
{
digitalWrite(led, HIGH); // turn on led
}
else // else turn off led
{
digitalWrite(led, LOW);
}

lcd.print("TEMP: ");
lcd.print(temp); // display the temperature
lcd.print("C ");
lcd.setCursor(0,1); // move cursor to next line
lcd.print("FANSPEED: ");
lcd.print(fanLCD); // display the fan speed
lcd.print("%");
delay(200);
lcd.clear();
}

int readTemp() { // get the temperature and convert it to celsius
temp = analogRead(tempPin);
return temp * 0.48828125;
}
After uploading the code the device works perfectly according to the working principle.
When the temperature is below 30 the fan is turned off and when temp is 60 the fan spins at full speed and when the temperature is above 60 5mm led light glows.
Output:
In the same way instead of using the Arduino you can use ESP8266, ESP32 microcontrollers, the only thing to modify is the circuit diagram and the pins in the code.
Applications:
Air-conditioners, Water-heaters, Snow-melting machines, Ovens, Mixers, Furnaces, Incubators, thermal baths and more.
To build this project for your AC fan you need to interface with other components which we are going to explain in futher articles. stay tuned.
If you find this project helpful please share it with your friends, and if you have any doubts or got any issues regarding this project please feel free to comment below or ask us on Facebook community page “Circuit Schools“. Your interest makes us happy and help to add more projects. Thanks and happy creations.


Why the 10uf cap between the pwm signal and ground?
As 2N2222 transistor works as a switch which is sensitive, to reduce the fluctuations and to amplify the signal we added 10uF capacitor.
Can I connect more than one fan, 4 fans exactly?. If possible how it will it affect the system? Is there components to be changed? Thank you!!
I think it won’t work as the voltage may not be sufficient. We will come up with new project with good sensors and reliable switches.
Thanks Circuitschools.
Hi can u help me, i connect with 12V dc fan, the fan not working when high temperature, but when i connect to multimeter, it show voltage output.
Did you connected the fan to 12v power supply, Check weither fan is working or not with direct 12volts. try to change the range of temperatures from the code. If still not working check the circuit again.
everything works, accept one – can’t get fan running at100 % rpm. it only spins at around 30% and makes high pitch noise
Could you use a PCB board for this too?